Tuesday, September 10, 2013
Wheely Big Auto Show at Best Buy HQ
Best Buy HQ is hosting an auto show to raise money for United Way. Event is from 11AM-2PM on 9/11/2013, lots of prizes and silent auction. I'll have my car on display in the electric vehicles section. You can find out more here: http://wheelybigshow.com
Tuesday, August 20, 2013
Heat related trouble
The weather is hot this week (92F, 80% humidity). Today I drove the car about 25 miles at speeds between 60-75MPH. When I got close to my destination, I noticed I couldn't send any power to the motor when I pushed the accelerator pedal. I down shifted so I could get off & up the exit ramp with some speed. As I pulled away from a stop light, the car was crawling even though I was in first gear with accelerator pedal floored! I barely crawled to my destination a few blocks away.
The issue was the motor controller was getting too hot, and it was self limiting the power to the motor so it didn't cook itself. I let the car sit for a few hours while I was at my event. When I returned to the car, the motor controller was still a bit warm so I put some leftover ice from a cooler on it to cool it down. Then I drove home. I got home just fine while driving high speeds.
I have the Soliton1 setup without any additional cooling. If you live in a warm environment, you should probably consider forced air or liquid cooling or you'll likely suffer a similar situation on a regular basis. Now that it happened to me once, I'm going to look into further cooling, but no promises yet.
Thursday, August 1, 2013
Inspection Complete - Passed!
I made it to the DMV Inspection site today and passed my inspection. They were mad that I *ruined* a Porsche, but I didn't want to argue. They really only looked at a few things: VIN through windshield, VIN under hood, and VIN on door. They signed the papers and let me leave.
A lot of B.S. for nothing.
A lot of B.S. for nothing.
Monday, July 22, 2013
On the road again
After weeks of distractions, I finally took the car apart to figure out what went boom on inspection day. Turns out the 8 bolts that hold the drivers side drive shaft to the transmission came loose, totally separating the drive shaft from the transmission output on the drivers side.
So, it was a pretty easy fix to re-assemble that section. This time I applied Locktite to the threads of all the bolts. It seems strange that all 8 would loosen up to the point of falling out, but whatever. Its fixed now.
I charged it up and put 30 miles on in the last 24 hours running errands.
Glad to be back on the road and ecstatic that the transmission was not the issue!
Now I just have to get the car inspected before the end of them month which is when my license tabs expire!
Tuesday, July 2, 2013
Inspection Day
I bought the car with a bad engine and a salvage title, so the state requires that I have the vehicle inspected before they grant me a rebuilt title and ability to renew my license tabs. So my inspection date was 6/28/2013 and I drove about 25miles from my house to the inspection site, but my car didn't make it. The engine and transmission started making a spinning metal noise about 2 blocks from the inspection site and soon after, the car's drive train crawled to a stop.
So, 2 blocks from the destination, I was stuck. I tried restarting and moving through the gears with the shifter, but nothing would make the car go forward or reverse, so I had to call a tow truck. Very ironic and frustrating to have this happen on inspection day, especially now that I have just over 1000 miles on the car!
I had the car towed back to my house and its now safely inside the garage. I'll have to put the car on stilts, and rip out the rear battery packs to get at the motor. I'm afraid I need to separate the motor from the transmission to look at the linkages -- its going to be a lot of work that I don't want to do!
Suck.

Sunday, June 16, 2013
Resistance update
I set aside two solid days to put the car back on jack stands and remove the front battery packs (cells 24-48) in order to disassemble, clean, and reassemble all the bus bar contacts. What I've learned from studying the data from the BMS is that all the inter-pack bus bars that were pre-assembled by GBS/ElitePowerSolutions are poor quality. After I got them all back into the car, the first test drive showed a reduction of about 24mOhms for those cells which cut the previous resistance in half! The change was noticeable while accelerating, the pack overall voltage drop is less and the total available amperage is higher -- so now I've added cleaning all the other cell bus bars on my to-do list. The good thing is they are much more accessible(no jack stands required) from the back of the car.
While under the car, I also repaired the rest of the wiring for the Kats tank heaters and new coolant pump. I'm glad I did this because during testing, I found out that one of the Kats heaters was burned out from the "incident" after the rainstorm. I replaced that while I had easy access under the car.
Overall, good progress. I've also been researching ways to add cold air conditioning to the car. I'm looking at HEV A/C compressors. Once I find the right solution I'll post more.
Monday, May 6, 2013
Cell bus bar resistances
I have not finished the heater/coolant pump wiring, but I have been driving my car daily, which has been awesome now that the weather is finally cooperating.
At the end of each day I've been printing a report from the BMS that shows each cell's resistance and I've been tracking the ones that are reporting higher than the cell manufacture's specified 1.8 mOhms. Over time I have been disassembling, cleaning, and re-assembling the buss bars for the cells that are reporting high resistances. This process, so far, has removed the high resistance issues that are being reported on those cells. So far, I've cleaned the 4 easiest to reach cells, but have another 20 or so to clean. Here is a view of the "before" report. Cell #3 was the first one I cleaned, and it is now reporting closer to 2mOhms.

At the end of each day I've been printing a report from the BMS that shows each cell's resistance and I've been tracking the ones that are reporting higher than the cell manufacture's specified 1.8 mOhms. Over time I have been disassembling, cleaning, and re-assembling the buss bars for the cells that are reporting high resistances. This process, so far, has removed the high resistance issues that are being reported on those cells. So far, I've cleaned the 4 easiest to reach cells, but have another 20 or so to clean. Here is a view of the "before" report. Cell #3 was the first one I cleaned, and it is now reporting closer to 2mOhms.

Thursday, May 2, 2013
New Coolant Pump
I installed the new coolant pump and automotive coolant tubing. It was very easy to hook up. I didn't have to screw around with any reducers or fittings to get it all connected. Now the entire coolant system is assembled with 3/4" automotive coolant tubing and hose clamps.
I refilled the system with 50/50 antifreeze mix and fired up the pump. It seemed to do the job, but it was hard to tell because you can't see the water flowing through the black tubing. So, to confirm operation, I turned on the heating elements and made sure the hot fluid was being spread about the system. Within a few seconds, the inlet and outlet tubes from the heater core where warm, and shortly thereafter, very hot. So it seems the fluid is moving nicely. I also confirmed turning the cabin fans on resulted in hot air coming in, which it did.
I still need to finish up the wiring for the pump and relay coil for the heater element. I also bought a temp switch that I'll use to cut power to the heating element when the fluid reaches temperature. The neat thing is the temp switch has a bit of hysteresis so it shouldn't flutter the relay on and off when the coolant starts to cool.
-K
Sunday, April 28, 2013
Updates
I did confirm that the 1000W power supply was also damaged beyond repair. I didn't want to throw down the same $$ for the 2 supply solution again, so I went a different route and replaced both DC-DCs with a single 750W supply from Astrodyne, the SP750-12. This set me back another $200, but now that its installed, I'm up and running again.
During the removal of the old supplies and the installation of the new supply, I found the source of the anti-freeze spray that blew out the DC-DCs. It was a two part problem. Water shorted out the circuit that turns on the relay that powers the dual 1500W Kats tank heaters, so the heaters turned on, but the fluid pump did not. So the stationary fluid got so hot that it melted a hole in the thinnest walled portion of the tubing. Picture below shows the hole. This tubing was used because I tried to re-use a coolant pump for a computer which required small tubing. I've ordered an electric automotive coolant pump and will replace with 3/4" ID automotive coolant tubing so that should no longer be an issue.
.JPG)
I also completed a few mods to the charger. I put the 15uF cap back in, and completed the install of the remote LCD display near the J1772 plug port inside the fuel cap compartment. See the picture below. Now I no longer have to open the hood of my car to change charger parameters.
.JPG)
I've also learned a few more things while driving the car... Driving in automatic mode sucks because every time I step on the gas, the transmission takes me out of gear and downshifts, oftentimes resulting in the car not going into any gear(that is a story for another day). Also, whenever I slow to a stop, the car automatically shifts back down into 1st gear, even though I'd like it to stay in 3rd or 2nd. What I found works best is to keep the position stick in the Manual position. This makes the Tiptronic computer back off on the auto-shifting, and only shifts when the vehicle conditions are getting to an non-operational state. So now, I can manually paddle-shift into 2nd gear, and it will stay in gear when I push down hard on the gas as well as when I come to a stop at stop lights. As I'm driving, I use the paddle shifters to move into 3rd-5th and the car generally stays in the gear that I leave it, with the exception of when I slow to a stop, it always drops me back down to 2nd, which is ok because I can leap off the line in 2nd.
Monday, April 8, 2013
Caught in the rain
I drove the car to work 4 days last week. On the last day, it rained unexepectedly and the car stayed in the rain all afternoon.
During the build process, I was cautious and paid attention to all the water drip lines so the water should shunt away from critical components, that being said, I was unsure how the car would fare in the heavy rain. I honestly had no intention to drive in wet conditions, let alone a downpour.
So, on my way home, I drove the usual 10 mile route, without issues which was great. However, after being parked in the garage for an hour or two, I smelled burning antifreeze. I immediately investigated and found that water had got into a circuit that caused the heater pump to pump antifreeze, and somehow that started leaking and spraying antifreeze into the low end DC-DC. The DC-DC fried itself and also blew one of the HV fuses which shut down the chain of events and prevented further damage.
I removed the low end DC-DC and confirmed it needs to be replaced. I also removed the 1000W DC-DC and need to test if that is also blown. More on that later.
Its a little frustrating because I have repair work to do, but in the grand scheme, it could have been a lot worse.
By the way, I have been using the charger without the 15uF cap that blew up, and it seems to be working as is. I have the replacement part and expect to get that installed soon. I also plan to move the LCD display to near the fuel tank port so that I no longer have to go near the charger to make charging adjustments!
Stay tuned.
-K
Successful charge at a ChargePoint location!
After a failed attempt to charge at a ChargePoint location in Maple Grove, I tried again at the Lunds in Minneapolis. This one first reported a GFCI fault, but on a second attempt, it worked.
In preparation for this trip, I also reviewed my vehicle side circuit and ended up added the diode D1 called out in this schematic from EVTV. I think this was the missing link previously.


In preparation for this trip, I also reviewed my vehicle side circuit and ended up added the diode D1 called out in this schematic from EVTV. I think this was the missing link previously.


Sunday, March 31, 2013
Another "Event"
A few updates today. Typing with one hand so they will be short.


1) Through experimentation, I figured out a square wave that is 50% duty cycle, +/-2.5V peak amplitude (5V peak-to-peak), centered at 0V works great for driving the RPM input. You don't need to compensate for the 2 missing pulses every 58, it works with a continuous clock.
2) I found out the TCU changes shift profiles based on engine temperature, so I set the 'water coolant temp' sensor input to 190F and the car shifts with less issues.
3) My ChargePoint card came in the mail, so I tried to use at a local station. I could not get it to output any juice, so I will need to review the circuit and see whats wrong.
4) I want to move my charger LCD display and controls from inside the charger bud box to the exterior charge port. In the process of using a tape measure, I dislodged a heat sink onto some live terminals and a small explosion occurred. The electrical plasma ball burned the inside of my hand and destroyed some capacitors, thus I am typing with one hand as the burnt hand is covered in Aquaphor.

Picture of my cooked hand. Inner sides of thumb and index finger took the brunt of the damage.
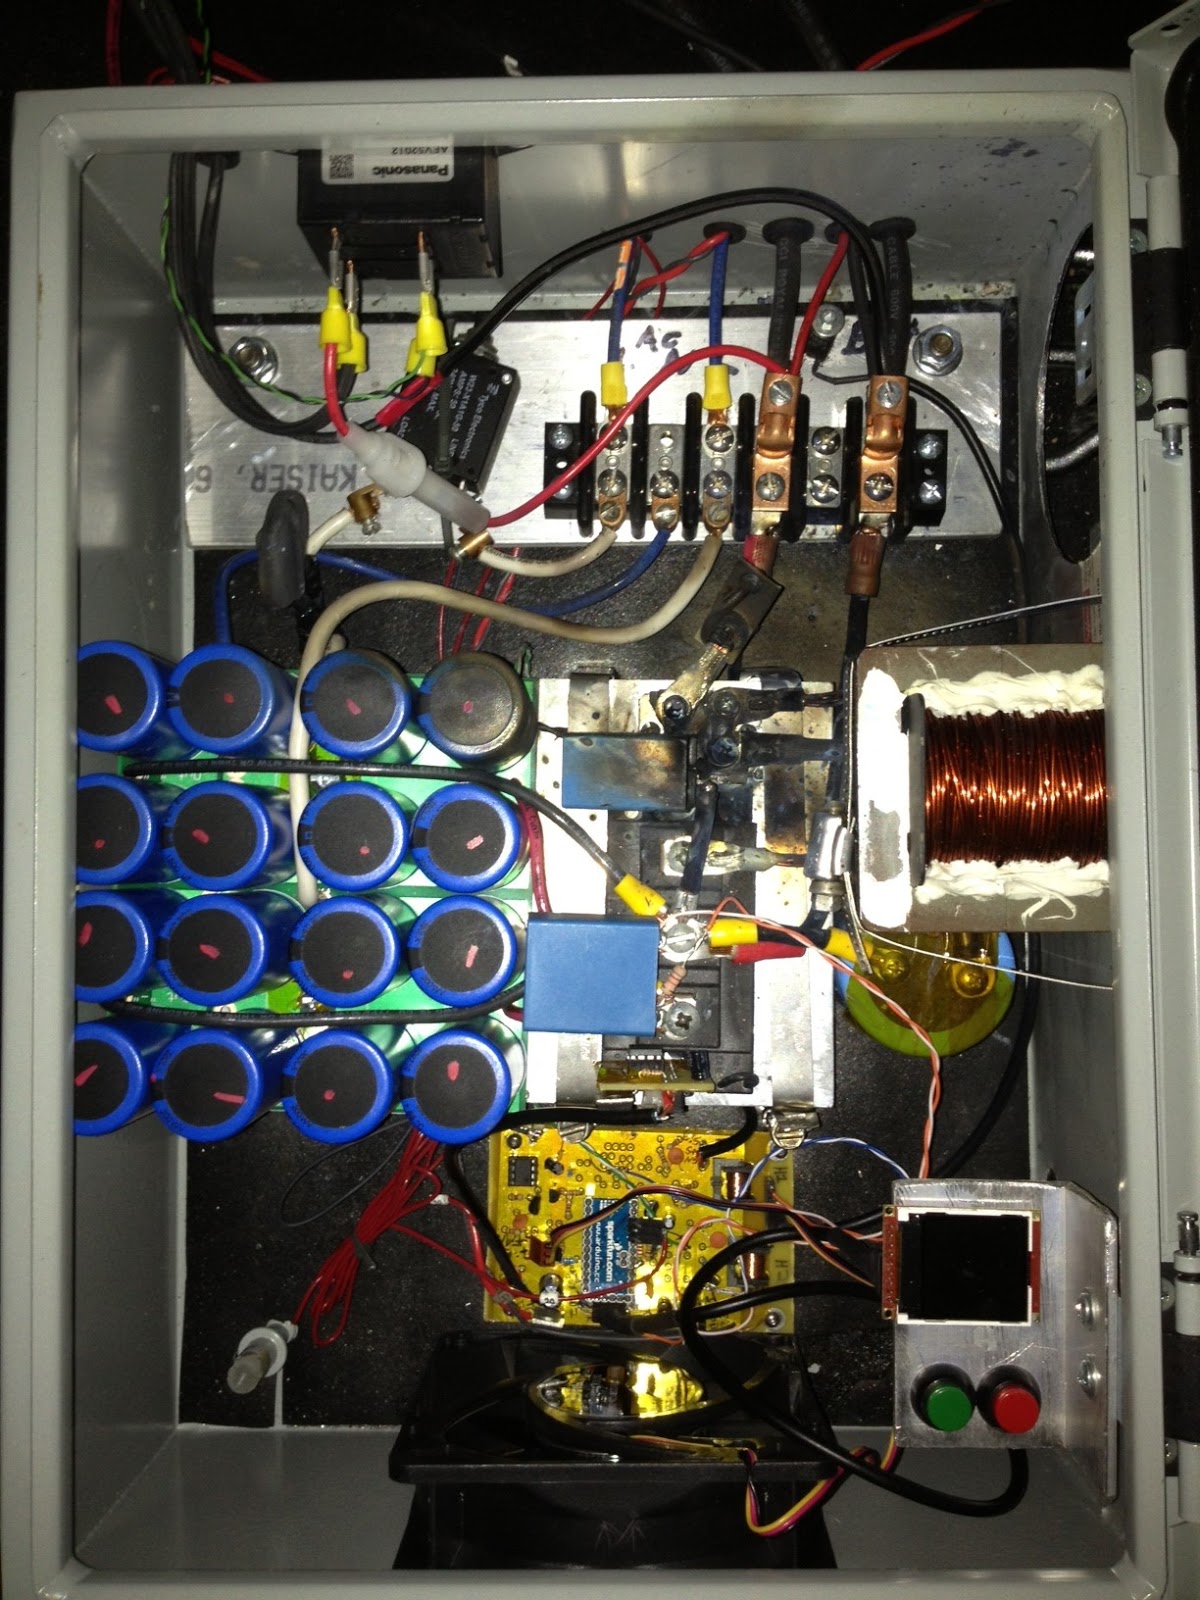
Inside of the charger showing burned devices just to the left of the coil.

Heatsink that shorted out the terminals.
Monday, March 25, 2013
Driving to work
I drove the car to work today, but ran into some trouble about half way. The transmission failed into limp mode and stayed in limp mode, so I had to drive to work in 2nd gear only. This limited me to about 45MPH at 4500 RPM.

I drove over to Imola autosports after work and they cleared the TCU for me which got me out of limp mode and allowed me to use the full range of gears again. On the way home I also noticed the in-dash RPM gauge spiking from 2000 RPMs to 8000 RPMs and back down to 2000 RPMS for brief moments. When this would happen, the transmission would release the current gear, I'd have to stop the car, put in park, turn off, then turn power back on, put back into drive before the TCU would re-engage any of the gears.
So, this is a show stopper. I need to fix the RPM glitches or its not really drive-able.
I also got these error codes from the TCU before clearing it -- any input on how I should tackle these??

-K
Sunday, March 24, 2013
Snow...
I woke today to fresh snow! How annoying as I really wanted to get out and drive.
The sun did come out and melt away the snow from the roads, so late afternoon, I took the car for a spin. I drove 8.5 miles around 50MPH speeds. I came home and charged up and put in 15AH of juice to fill it up (4.8KWH). So at this rate, I'm burning 564WH/Mile which is about 1.8M per KWH.
So assume I want to use 84AH out of the pack which leaves a 5.1KWH buffer, I project a usable range of 47 miles at this speed. If I burn the pack down to zero, its about 56Mile range.
I'm not sure how this will affect usable range yet, but its important to note the temperature was around 32F.
Saturday, March 23, 2013
More driving!
The sun was out again today and it may have hit 40F. Last night I swapped out the RPM wires with shielded cable and this morning I tested it out and put 16 miles on the car at high speeds (80-100MPH) without any issues.
Wahoo! Things seem to be working for now.
After getting home and charging at a nice slow 6amps all afternoon, the charger reported ~42AH going into the pack which roughly equates to 13.4KWH. Which means while driving at high speeds, the car burns 839WH/Mile which is about 1.2 Miles per KWH.
So traveling at high speeds, I should budget about 32 miles of range, which leaves 5.1KWH buffer so I don't wreck the batteries... Good to know. Tomorrow I will do some more *normal* driving experiments.
Friday, March 22, 2013
Busted!
.JPG)
I had a run in with the cops today. The weather reached a high almost 37F, the sun was out, and the roads were dry, so I decided to take my car for a little spin. This was the first time since early January. I leisurely drove out of my neighborhood and took a left onto a busier street. As I pushed on the gas, I notice the car did not shift from 2nd to 3rd gear -- its like it slipped completely out of gear and all I could do was coast to the shoulder.
I put the car in Park, turned on my flashers, and tried to shift from Park to Drive, Reverse, etc, but the transmission would not engage. I frantically kept trying to get into gear, any gear! Until I saw flashing lights.
The first car to drive past was a pair of undercover police officers in an unmarked car. They put on their flashers, pulled up behind me, and came over to chat. They asked if everything was OK and offered to use their car to push my car off the main road, or call a tow-truck. I explained that the car was in "experimental" stages and that I had converted from gas to electric and the transmission was not going into gear. That got them interested and they started asking questions and I showed them the ins and outs. Luckily my house was a couple hundred yards away and my brother was coming with a tow strap so they let me wait without calling a tow truck.
A squad car pulled up with a 3rd officer and he stayed to block traffic while the unmarked car left.
My brother towed me back home, and once safe again in the cul-de-sac in front of my house I experimented around a bit until I figured out what was going on. If I shut the car off, and turned it back on, the transmission would engage, but after the RPMs rev'ed up, the transmission would disengage. I noticed my RPMs were actually bouncing all over the place. This is a sign that the circuit I made that converts the actual motor RPM to the car's ECU input is not working properly. In fact, it looks like a ton of noise is being injected into the system and causing the micro controller to miscount the RPMs, thus the ECU is getting confused and ultimately telling the transmission to disengage.
A few things come to mind -- this was not a problem when I parked the car in January, the wiring near the motor has been changed and is not fixed in place, the car is now running at 350V, not 250V. So with these things in mind, the additional voltage definitely creates more powerful noise waves, and the location of the RPM sensor wiring may have changed and may need to be shielded better to prevent the unintentional pickup. Maybe I need a better low pass filter on the input.
So now I need to figure that out before I can take it on the road again, hopefully tomorrow!
Wednesday, March 20, 2013
Buttoning up the bottom
Today I finished cutting the HDPE plastic to fit the underside of the engine cavity and I mounted it to the bottom of the car. Lots of cutting and monkey business to get it to fit. It should act as good protection from the grit coming off the road and tires as well as help the underside aerodynamics.
I'm also continuing to balance the rest of the cells. It looks like 92 of them are doing great, and one pack (4 cells) are a bit lower than the rest, so I just need those to come up a bit and I can call it good.
Tuesday, March 19, 2013
350V Wiring Complete!
I wrapped up wiring the BMS and main pack wires to the additional 24 cells today bringing the pack to a grand total of 96 cells and 350V(at peak charge). I was careful to verify the BMS wiring before plugging into the OrionBMS controller to make sure I didn't repeat history and blow a fuse from an out of order wire. Lucky for me, I did it right the first time. With a few software adjustments the OrionBMS now reports all the batteries without any warnings. I also adjusted the charger for 96 cells and recalibrated the high voltage cut-off point.
Despite charging the 24 cells before putting them into the car, their voltages are lower than the other 72 so now I'm working on balancing the pack again.
All I need to do now to get this thing back on the road is attach the plastic belly pan and make the snow melt outside! Hurry up Spring!
Despite charging the 24 cells before putting them into the car, their voltages are lower than the other 72 so now I'm working on balancing the pack again.
All I need to do now to get this thing back on the road is attach the plastic belly pan and make the snow melt outside! Hurry up Spring!
Monday, March 18, 2013
Belly Protection & Battery Brackets
Over the past few weeks I have been working on adding the final 24 cells to make a total of 96 cells in the car. Here are some time lapse shots of working on the battery brackets and plastic paneling that will cover the bottom of the car to keep road debris out of the motor and battery compartment. More videos coming in a few days.
Monday, March 4, 2013
Safety Fuse
This past weekend I installed a 400Amp fuse inline with the main pack. First picture shows the lugs bolted to the fuse with 3/8" bolts.
.JPG) 2nd picture shows a large PVC pipe that is slid over the fuse and terminal lugs to protect them from making contact with the frame of the car.
2nd picture shows a large PVC pipe that is slid over the fuse and terminal lugs to protect them from making contact with the frame of the car.
.JPG)
.JPG)
.JPG)
Subscribe to:
Posts (Atom)